Near Top Lane
-
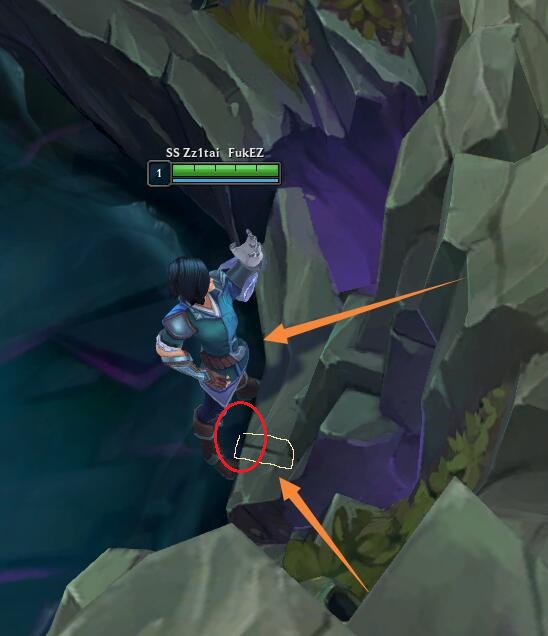
Wall Warding - Blue Side Top River Entrance
As shown in the diagram below, the highlighted area with a bright line is where you need to ward. This method is recommended when you cannot cross the river due to heavy enemy presence on the lane.

After placing the ward, the visibility should be like this (able to see enemy champions in the brush).

First, locate the thick bush near the wall (similar to a crab claw plant?). Stand on top of this plant (position your character's legs to block the bush), then find the triangle shape marked on the inner side of the wall. The right angle of the triangle extends towards the right with a yin-yang boundary line. Ward near the position indicated by the orange arrow, ensuring an 80% success rate.
Be cautious not to place the ward too low, as it might go into the curved area under the wall. Placing it too high might reveal the river brush. This position can be tricky to find and requires practice.

-
Wall Warding - Red Side Top Lane Tri-Brush
The position of the tri-brush is marked with bright lines. This method is useful when warding from Blue Side Top Lane towards Red Side Tri-Brush (or for Red Side when warding defensively after pushing minions across the river).

After successful warding, the visibility should be similar to the image below. The challenging part of this spot is that it often ends up as an outer brush ward. To place it precisely inside the brush, be mindful of the nearby tree trunk.

When zoomed in, you can see several forks on the adjacent tree trunk. There are three forks on the leftmost side. Placing the ward on the left two forks (not outside the trunk but precisely on the bark where it forks) ensures it's inside the tri-brush. The highlighted positions are generally effective.

Around the Baron Nashor Pit
-
Wall Warding - Tri-Brush Above Dragon Pit (Also Red Side Top Lane Tri-Brush)
The required position is marked by the bright lines in the diagram below. The difficulty in this location lies in warding too far or outside the brush.

When successful, your visibility should be like this↓, allowing you to see enemy champions in the brush.

When warding here, note the crack in the Dragon Pit (which might appear purple). Position yourself and locate a nearby stone tablet in the same direction, along with a sharp stone wall extending from the pit.
The effective area is shaded within the bright lines in the diagram.

2. Wall Warding - Right Side of Dragon Pit Brush
Personally, I believe this is currently the most challenging but valuable warding position. The brush you need to ward is as shown in the diagram below. This position is very prone to revealing the ward, so be cautious! (Remember to place enemy dummies inside this brush while practicing.)

The successful effect is depicted in the image below. (Take note of Ezreal's position at this moment.)

Here's a breakdown of the demonstration: First is the warding position: When you zoom in on the right side brush, you can see two darker but shorter leaves (pointing towards the Dragon Pit direction). I highlighted them with bright lines here (I placed a ward outside the pit to increase visibility). On these leaves, I marked the valid inner warding position with red lines. It's a "へ" shaped leaf, and the generally effective positions are on the upper outer edge of the left half bend and the outer edge of the bend. Note that it's the outer edge; the inner edge is usually either impossible to ward or reveals the ward outside the brush.

Next is the positioning: Inside the Dragon Pit, there's a thick black crack. Pay attention to finding the crack's opening and position your cursor right on the opening or slightly above it (approximately one cursor width to the left or right). The image below shows the positioning after successfully placing the ward, focusing on the center of the model's feet.

In summary, this warding position requires experimenting and practice.
Near Mid Lane
Wall Warding - Left Side of Outer Mid Tower Brush
The brush position is as shown in the diagram below. This warding position relies not only on reference points (the withered tree on the left of the tower) but also on your perspective. If you rely on reference points for warding, ensure your view is adjusted so that the outer mid tower is in the center-right bottom of your screen. Otherwise, you might place the ward outside the brush or fail to get it over the wall.

When successful, the result looks like the image below. It appears as though the ward is placed outside the brush, but you can still see the enemy dummies inside the brush.

I shaded the effective area with bright lines in the diagram. Only a portion of the withered tree branch is a valid position.

When your in-game view maintains the appearance shown in the image above (meaning your camera angle makes the branch look similar, showing branches on both ends), you can place the ward inside this brush even if you're standing on the other side of the wall. See the image below.

When you move your camera so that the outer mid tower is at the bottom right corner of your screen, the warding spot you click cannot be the branch segment. You need to choose the area below and to the right of that branch segment. Be mindful!
More safe experience: ELO Boosting; LOL Acoounts